Requirements
Some package requirements (debian/ubuntu):
$ sudo apt-get update
$ sudo apt-get install tar git curl nano wget dialog net-tools build-essential
$ sudo apt-get install libssl-dev libmysqlclient-dev libpq-dev virtualenv
From source
Requires Python >=3.5.0. Download and install from source (tip: install in /opt since it might interfere with other
python installations, present or future):
$ wget https://www.python.org/ftp/python/3.5.4/Python-3.5.4.tar.xz
$ tar -xvf Python-3.5.4.tar.xz
$ cd Python-3.5.4/
$ sudo mkdir /opt/python-3.5.4
$ ./configure --prefix=/opt/python-3.5.4 --enable-shared LDFLAGS="-Wl,-rpath /usr/local/lib" --enable-optimizations
$ make
$ sudo make altinstall
Add the paths to your .bashrc or .profile:
export PATH="/opt/python-3.5.4/bin/:$PATH"
export LD_LIBRARY_PATH="/opt/python-3.5.4/lib/:$LD_LIBRARY_PATH"
Install requirements:
$ source env/bin/activate
(env) $ pip install -r requirements.txt
Using MiniConda
Install miniconda:
$ wget https://repo.continuum.io/miniconda/Miniconda3-latest-Linux-x86_64.sh
$ bash Miniconda3-latest-Linux-x86_64.sh # assuming defaults accepted
$ source ~/.bashrc
Create your environment and install the requirements:
$ conda create -n env python=3.5
$ source activate env
$ pip install -r requirements.txt
Other requirements
If you're using redis, postgresql/mysql and/or cassandra, please see relevant documentation for how to install:
Installing
There are a few choices included for how to install Dino.
Simple
Just clone and run from the cloned directory:
$ git clone https://github.com/thenetcircle/dino.git
$ cd dino
$ virtualenv --python=python3.5 env
$ source env/bin/activate
(env) $ pip install --upgrade -r requirements.txt
(env) $ pip install --upgrade --no-deps .
Using init script
$ git clone https://github.com/thenetcircle/dino.git foobar-prod
$ cd foobar-prod
$ virtualenv --python=python3.5 env
$ sudo cp bin/initd/dino-app /etc/init.d/
$ source env/bin/activate
(env) $ pip install --upgrade -r requirements.txt
(env) $ pip install --upgrade --no-deps .
Make sure to update the init script to use the correct paths.
Using the supplied install script
The install script will copy the systemd files to /usr/lib/systemd/system/, one for each service/environment you
install for.
$ pwd
/home/dino
$ git clone https://github.com/thenetcircle/dino.git foobar-prod
$ cd foobar-prod
$ virtualenv --python=python3.5 env
$ sudo ./bin/install.sh foobar-prod /home/dino/foobar-prod app 5200
$ sudo ./bin/install.sh foobar-prod /home/dino/foobar-prod rest 5400
$ sudo ./bin/install.sh foobar-prod /home/dino/foobar-prod web 5300
$ source env/bin/activate
(env) $ pip install --upgrade -r requirements.txt
(env) $ pip install --upgrade --no-deps .
Clustering
If clustering dino, install a reverse proxy that supports websockets, e.g. nginx (>= 1.4). Here's an example configuration:
upstream gridnodes {
    ip_hash;

    server some-ip-or-host-1:5210;
    server some-ip-or-host-2:5210;
    server some-ip-or-host-3:5210;
    server some-ip-or-host-4:5210;
    server some-ip-or-host-5:5210;
    server some-ip-or-host-6:5210;
    server some-ip-or-host-7:5210;
    server some-ip-or-host-8:5210;
}

map $http_upgrade $connection_upgrade {
    default upgrade;
    '' close;
}

server {
    listen 5200;

    location / {
        access_log on;

        proxy_pass http://gridnodes;
        proxy_next_upstream error timeout invalid_header http_500;
        proxy_connect_timeout 2;
        proxy_set_header Host $host;
        proxy_set_header X-Real-IP $remote_addr;
        proxy_set_header X-Forwarded-For $proxy_add_x_forwarded_for;

        # WebSocket support (nginx 1.4)
        proxy_http_version 1.1;
        proxy_set_header Upgrade $http_upgrade;
        proxy_set_header Connection "upgrade";
    }
}
Running the application
A few examples are included for running Dino: running in the foreground, using systemd and the deploy script, docker and lastly kubernetes.
Simple
Running in the foreground:
$ cd dino/
$ virtualenv --python=python3.5 env
$ source env/bin/activate
(env) $ DINO_ENVIRONMENT=dev gunicorn \
            --error-logfile ~/dino-gunicorn-error.log \
            --log-file ~/dino-gunicorn.log \
            --worker-class eventlet \
            --threads 1 \
            --worker-connections 5000 \
            --workers 1 \
            --bind 0.0.0.0:5210 \
            app:app
To run the rest API and admin interface use the same command but change app:app to rest:app and web:app
respectively.
Using the deploy script
The simple deployment script included pulls from git master, shuts down services, clears online tables then starts
everything up again. The script assumes the base directory where the project is checked out has the same name as the
environment. The deployment script also assumes you're running with systemd and have used the installation script
to first install Dino. The deployment script will deploy for all services that are installed for the environment, so if
you've only installed the app and rest service but not the web service, then only the app and rest service
will be re-deployed.
So if you're environment is called foobar-prod:
$ cd /home/dino/foobar-prod
$ DINO_ENVIRONMENT=foobar-prod DINO_HOME=/home/dino/foobar-prod ./bin/deploy-simple.sh
starting deployment...
pulling from git...
Already up-to-date.
stopping web...
stopping rest...
stopping app...
clearing online cache...
clearing online db tables...
starting app...
starting rest...
starting web...
deployment done!
Running in Docker
First create the image:
sudo docker build -t dino .
Then we can run it (create an environments file in secrets/ for your chosen environment (dev/prod/etc), e.g.
secrets/dev.env. Check the secrets/default.env for an example. Then we can run the image:
sudo docker run --env-file=secrets/dev.env --env DINO_PORT=5120 -t dino
Note that we didn't put the port in the dev.env file (though we could), because if starting multiple dino nodes they
need to use different ports.
Running in Kubernetes
For running in Kubernetes we need to use Kubernetes Secrets instead of the .env files. Example configuration for
some secret values for your pod:
apiVersion: v1
kind: Pod
metadata:
  name: secret-env-pod
spec:
  containers:
    - name: mycontainer
      image: redis
      env:
        - name: DINO_DB_HOST
          valueFrom:
            secretKeyRef:
              name: dev-secrets
              key: db-host
        - name: DINO_DB_USER
          valueFrom:
            secretKeyRef:
              name: dev-secrets
              key: db-user
  restartPolicy: Never
Read more on Kubernetes website on how to create the secrets object and then how to configure your pod to use it.
Monitoring
Dino can be extensively monitored by configuring a statsd endpoint. In dino.yaml you can either choose mock to disable metrics:
stats:
  type: 'statsd'
  host: 'mock'
Or choose statsd with a host and port to publish all metrics to a statsd host, for example like this:
stats:
  type: 'statsd'
  host: '$DINO_STATSD_HOST'
  port: 8125
  prefix: 'dino.myapp'
  include_hostname: 'true'
If you choose true for include_hostname (good when running multiple nodes on different physical machines, in this example
it's skybox-04) then the value of import socket; socket.gethostname() will be added after the value supplied for prefix.
So in the example above, when the mean timer value of the metric for how long time the api action on_login takes would be:
dino.myapp.skybox-04.event.on_login.timer.mean
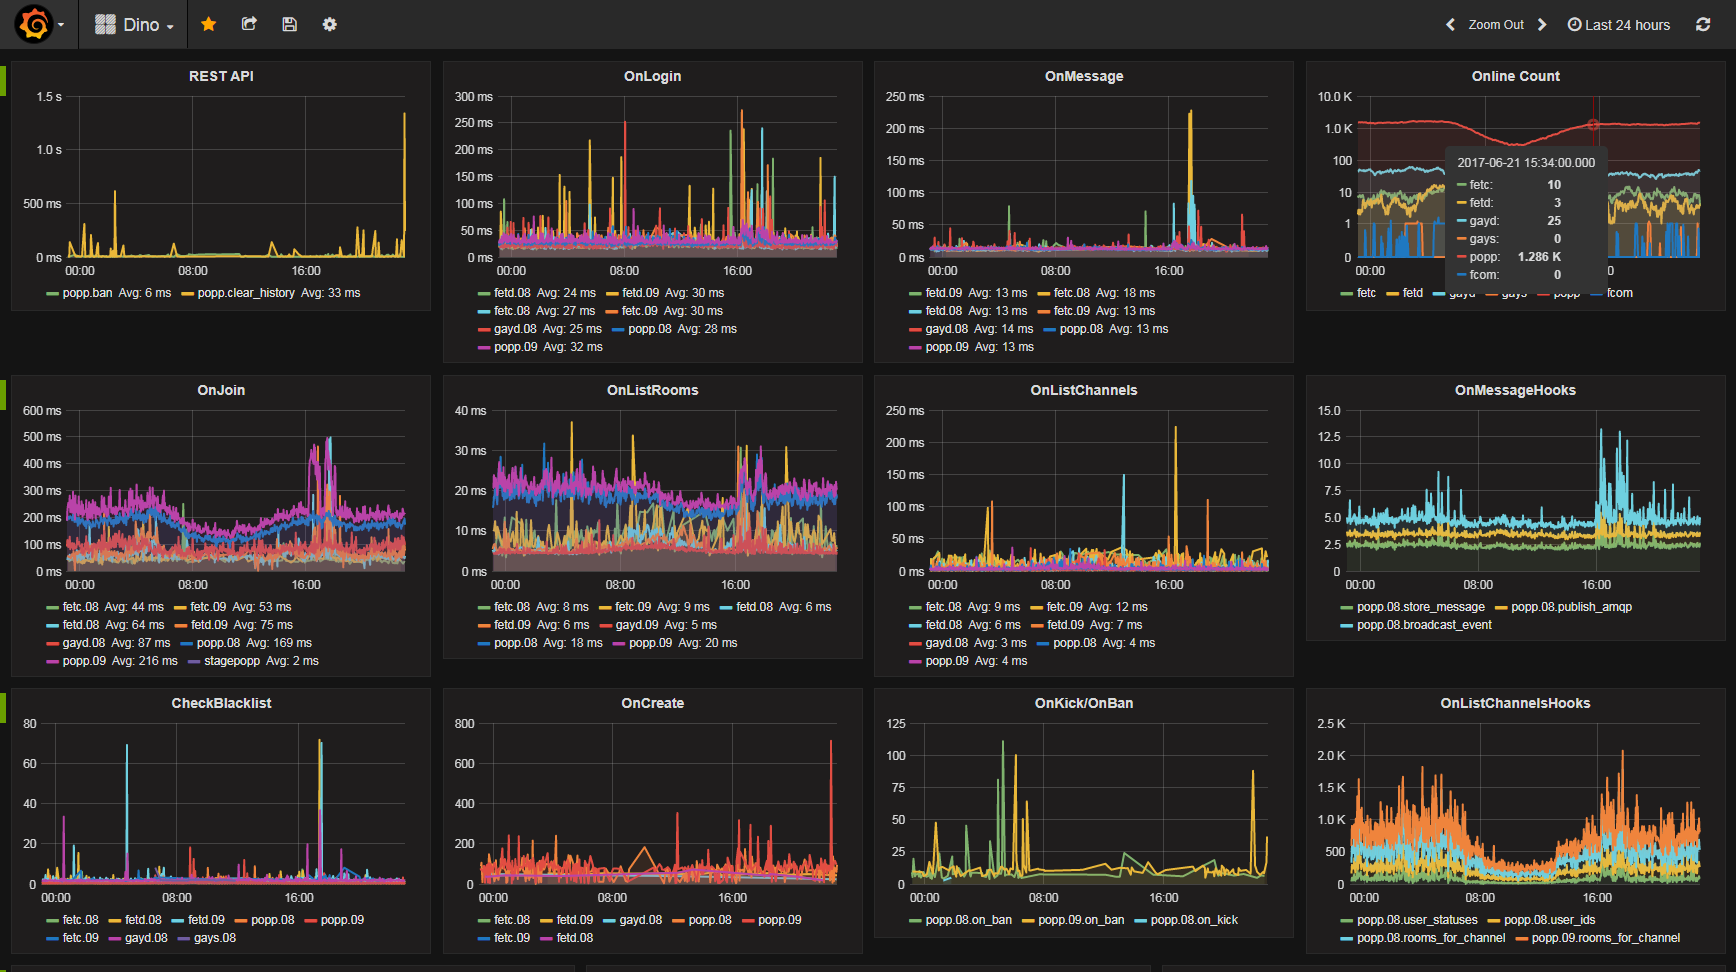
An already configured solution for statsd with influxdb and the grafana frontend exists with
the following docker image:
docker run -d \
  --name grafana \
  -p 3003:9000 \
  -p 3004:8083 \
  -p 8086:8086 \
  -p 22022:22 \
  -p 8125:8125/udp \
  advantageous/grafana:latest:latest
And configure the statsd host to the IP you run the docker image on, and the port 8125. Example of enabling this statsd
host with this docker image running:
Building the documentation
Viewing locally:
$ mkdocs serve
Building the site (not necessary):
$ mkdocs build
Deploy to gihub pages:
$ mkdocs gh-deploy